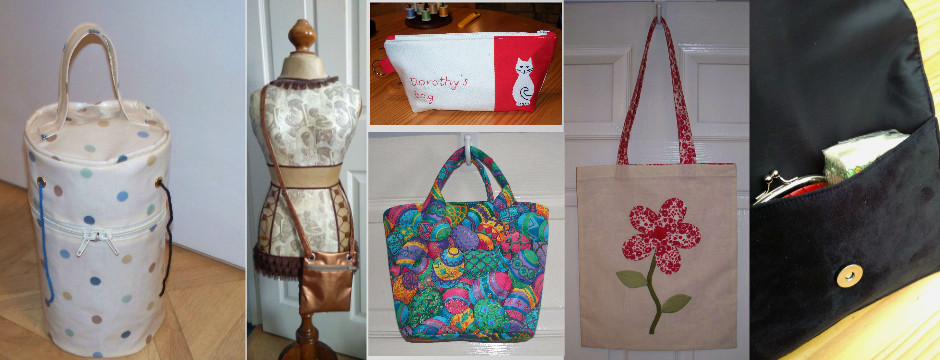
 This week’s
bag is a yarn bag. I’ve never owned one
but have often looked at them in the shops. They all look pretty much like this
one (they’re all round, but then when did you last see a square ‘ball’ of
yarn?), so I haven’t been very original in my design, but it was fun working
out how to put it together. Next week I’m going to make a matching knitting
bag, so come back and see how I get on with that. I’ve already got a design in mind...
This week’s
bag is a yarn bag. I’ve never owned one
but have often looked at them in the shops. They all look pretty much like this
one (they’re all round, but then when did you last see a square ‘ball’ of
yarn?), so I haven’t been very original in my design, but it was fun working
out how to put it together. Next week I’m going to make a matching knitting
bag, so come back and see how I get on with that. I’ve already got a design in mind...
I had been
thinking about the construction of this bag all week and kept changing my mind
about how I would make it. In the end I incorporated all the design features
that I like – a tab with D ring in case I want to attach anything to the
bag. I’m not sure what I’ll want to
attach but I like to have it just in case.
There’s a small internal pocket for sewing needles, row counters, etc.,
eyelets for pulling the yarn through so that I don’t have tangled balls rolling
around the floor and I just love the double sliders on the zip so that I only
need to open half the bag.
This would
look great in any fabric – a quilting cotton would be much easier to sew but
being a lighter weight fabric, would need interfacing and/or wadding to give it
some body.
As the fabric
was quite bulky, I increased my stitch length from its normal 2.5 to 3 for
seams and 3.5 for topstitch and I was really pleased with the effect.
This is not a
project for a beginner because PVC isn’t the easiest fabric to manipulate. If using PVC for the first time, I would
suggest a project with more straight lines which are much easier to sew.
Skills used in this project:
Sewing with
PVC fabric
Making and inserting
piping
Inserting
eyelets
Inserting a
zip with double sliders
Step 1: Cutting out

Cut out the
following pieces from the PVC fabric:
6” diameter
circle (cut 2)
18” x 7 ½”
for lower bag body (cut 1)
18” x 3 ½”
for upper bag body (cut 1)
3 ½” x 1 ½”
for zip tabs (cut 2)
10 ½” x 3”
for handle (cut 1)
3” x 3” for D
ring tab (cut 1)
18” x 1 ½”
for piping (cut 2) – no need to cut on the bias as it doesn’t appear to make
any difference for PVC
From the
lining fabric, cut 2 circles, 1 lower body and 1 upper body using the same
measurements as above.
Also cut a 3
¾” x 4 ½” rectangle from the lining fabric for the internal pocket. Alternatively you could use a co-ordinating
fabric (but PVC will be too heavy). If
you want a larger pocket e.g. for knitting needles, change the size according
to your needs.
You will also
need:
A rectangle of medium weight sew-in
interfacing 3 ¼” x 4 ¼”
2 lengths of
piping cord 18” long (I used 6mm piping cord)
An 18” zip
with 2 sliders (I used an N5 continuous zip which I cut to size)
2 eyelets (I
used 5.5mm) and an eyelet fixing tool
Bias binding
to neaten the internal seams ¾” – 1” width depending on thickness of fabric
used
A 1” D ring
You will also
need clips instead of pins as pins will leave permanent holes in the PVC.
Step 2: Make zip end tabs

If using a
continuous zip, make sure that both sliders are in place and facing each other. Fold zip tabs in half lengthways and place
them over each end of the zip. They will
enclose approximately 1 ½” of the zip at each end. This makes the zip very
secure when sewn in place. Fold under
the raw edges where they cross the zip by ¼” and top stitch across the fold,
making sure that both sides of the tab are sewn. Trim the sides of the tab so that they are
the same width as the zip.
Step 3: Sew zip to main fabric and
lining


Clip the lower bag body PVC and lining to the zip making a zip sandwich, right sides of fabric together. I used a polyester lining which doesn’t have a right or wrong side. The right side of the PVC needs to be attached to the right side of the zip. Sew.
Do the same
on the other side of the zip, then top stitch along the fabric on both sides of
the zip, close to the edge – this gives a professional appearance.
Step 4: Make internal pocket

The top of
the internal pocket needs a double hem to prevent fraying. To do this, fold the pocket fabric over
towards the wrong side (if there is one) by ¼” and then do the same again. Sew.
Fold under the remaining 3 edges by ¼” and pin to hold the hems in
place. There is no need to sew them yet
– you can do this as part of the process of attaching the pocket to the bag
lining.
Choose where
you want to position your internal pocket.
I wanted mine near the back of the bag not too far down from the zip so
I put it quite near to the edge but not so near that it interfered with the
bag’s side seam.
Place the
interfacing on the wrong side of the lining (between lining and PVC) and pin
where you want your pocket to be. Pin the pocket fabric to the right side of
the lining so that the seams will be inside the pocket. Sew around the sides and bottom, sewing the
pocket fabric on one side and the interfacing on the other to the lining at the
same time. The interfacing gives the
pocket extra strength.
Step 5: Make D ring tab
 Fold the PVC D ring tab in half and then fold in the raw
edges so that the finished tab will be just under 1” wide. Top stitch along the both sides of the length
for a professional look. Slip the D ring
onto the tab and fold the tab over, securing the ends by clipping or sewing
them so that the D ring can’t fall off. Choose where you want the tab to be and
clip it to the bag so that the raw edges of the tab face towards the seam. At this point, you can choose how long you
want your tab to be and make it shorter if required.
Fold the PVC D ring tab in half and then fold in the raw
edges so that the finished tab will be just under 1” wide. Top stitch along the both sides of the length
for a professional look. Slip the D ring
onto the tab and fold the tab over, securing the ends by clipping or sewing
them so that the D ring can’t fall off. Choose where you want the tab to be and
clip it to the bag so that the raw edges of the tab face towards the seam. At this point, you can choose how long you
want your tab to be and make it shorter if required.
Step 6: Sew side seams (attaching D
ring tab and bias binding)

Join the side
seam (which will also sew the D ring tab in place) by matching the right sides
of the PVC. Sew through the lining as well as the PVC so that all pieces are
joined at the side seam.
Trim the
edges so that they are neat and even.
Sew bias binding over raw edges for a professional finish. As the PVC is so thick, you will need at
least ¾” binding but this will depend on the weight of the fabric. You can make your own bias binding or buy it
ready made from a haberdashery store.
To attach the
binding, sew the right side of the binding to the seam just inside the
stitching. Fold it over the raw edges
and sew along the seam length so that the binding encloses the edges of the PVC
and lining.
Step 7: Make the Piping

Fold under
one narrow end of each of the piping
strips by ¼” and clip. Fold them in half
lengthways right sides facing out, inserting the piping cord as you fold. Sew along the strips close to the piping. It
is easier to get close to the piping cord if you use the zip foot on your
machine. Trim along the length about ¼” from the line of stitching (allow a
little more if you are not used to sewing circles – they can be tricky).
Step 8: Sew base to bag (including
bias binding)

Attach the
piping to the right side around the base of the bag with the raw edges of the
piping matching the raw edges of the bag.
Start sewing about 1” from the ‘folded under’ end. When you have gone nearly all the way round,
trim the other (non-folded) end of the piping so that it slots neatly inside
the folded end to form a join. The
piping cord should meet, but the PVC should overlap by about ¼”. Finish sewing
all the way round.
Attach the lining and PVC base at the same time. Turn the bag so that the wrong side is facing out. The PVC base’s right side needs to face inwards towards the right side of the bag, so the lining will be facing towards you as you sew. Clip circles to edge of bag and piping and then sew. It looks at first as though it will never fit together but it will! Imagine the circles are clock faces and start by clipping the base to the sides at 3, 6, 9 and 12. Then use clips in between. When sewing circles, they have to be gently eased into place gradually. Sew all the way round, close to the binding, attaching the base to the body.


Sew bias
binding all the way round to cover the seam.
Start by folding of the edges at one end and start attaching the binding
about 1” from the end. When you have
sewn nearly all the way round, trim the binding so that it overlaps by about ¼”
and insert the cut end under the folded end.
Finish sewing the binding in place.
Step 9: Make eyelets
Decide where
you want to put the eyelets and how many you want. There’s nothing to stop you adding more
later. A lot of commercially available
yarn bags have the eyelets in the top of the bag, but I was concerned that if I
go out with the bag in the rain, having the eyelets on top will let in the
water, so I put them about half way down the top section of the bag. I decided to have two of them as I rarely
need more than two colours. Both eyelets
are at the front of the bag, about 5” apart, but you can position them anywhere
which suits you.

You will need
an eyelet tool which is the right size for the eyelets you have chosen. Starter
kits are available which contain a tool and about 40 eyelets. Follow the
instructions. They usually tell you to
make a hole with part of the tool and then place the 2 parts of the eyelets
either side of the fabric and either hammer or use special pliers to apply
pressure so that the two parts fit together.
Step 10: Attach handle
Both short
ends of the handle fabric need to be folded in by about ¼”. The PVC is then folded in half lengthways and
the raw edges on each side folded under by about ½” (making a 1” wide
handle). Topstitch close to the edge all
the way round.

If the bag
was going to be used for heavy items, I would reinforce with interfacing
between the PVC and lining, attaching the handle to both the PVC and
interfacing. However, as yarn is comparatively
light, it wasn’t necessary in this case.
Position the
ends of the handle splayed out on the right side of the PVC circle which will
form the top of the bag. Sew it to the
PVC circle by sewing a cross about ¾” -1” in size at each end.
Step 11: Sew top to bag (including
bias binding)


Decide where
you want to position your handle. I
chose to have it going across the top of the bag with the bag seam to the rear,
but it doesn’t really matter. When you
attach the top to the bag, make sure the handle will be in a position that you
will be happy with.
Attach the
top in the same way that you attached the bottom and add the bias binding to
neaten the edges.
Now fill your
bag with yarn and start knitting!
In this project I learnt:
I have used
PVC before and really enjoyed it.
However it can be tricky. I use a
leather needle now whenever I sew PVC and haven’t had any problems. It’s not
necessary to use a special foot but if you are sewing with the shiny side
towards the feed dogs (only done when absolutely necessary), the fabric might
need to be coaxed along at first. Use a
slightly larger stitch length than usual for best results as PVC is bulky to
sew.
This was the
first time of using 2 sliders on a zip.
I really like the effect and it was no more difficult than attaching one
slider and sewing on a normal zip.
I had been
avoiding eyelets for years, thinking they were really tricky but they were dead
easy. I practised a couple of time on
some spare fabric. It’s a good thing I
did because I applied far too much force in my first attempt and the eyelet
became stuck in the tool – I had to dig it out with a knife, damaging the
fabric in the process. After that I was
gentler and had no problems. It shows
that sometimes it’s worth taking a bit longer and practising so that the
finished article is perfect
I had never
sewn a zip onto PVC before. There
weren’t any problems as such but I couldn’t feel exactly where the teeth of the
zip were and could have sewn closer to them.
Another time I would mark a sewing line on the fabric.
I don’t
usually bother with piping because I’m not that keen on the look of it. However, in this bag, it really finishes off
the top and bottom. Like the zip, it was really difficult to sew close enough
to the piping to get the right effect. I
used a zip foot but still struggled and had several attempts. I got there in
the end by trial and error. Perhaps a contrasting cotton bias binding might
have been easier to use with the same effect.
I used ½”
ready made bias binding which I had in my stash, but because the seams were so
thick, it wasn’t really wide enough. I
couldn’t be bothered to make any and it was Sunday afternoon so the shops were
shut. I wish now that I had made the
effort because the bias binding is the only thing that lets the bag down (it
still looks great unless you really peer inside at the top and bottom which, of
course, no one else will because it is full of yarn).
You don’t
need expensive fabrics to make a great bag.
This looks similar to yarn bags in the shops but the fabric only cost a
few pence (the PVC was £2.99 a metre). I
had to shop around for a nice quality PVC that wasn’t too thick or rigid, but I
was very happy with this one – a real bargain.


