

My aunt is
incredibly generous and I wanted to make this bag to thank her for some lovely
gifts. She is a keen paper crafter who
regularly attends classes and workshops, so I thought this bag would be the
ideal size to take her pens, scissors, etc. to classes.
She loves
animals so I chose an easy cat appliqué which complemented the cat fabric on
the other side. I also added her name in
free motion embroidery to personalise it and make it totally unique. I like the fact that the techniques used in
this bag could be used on almost any bag to make it stand out.
I used a ¼”
seam allowance throughout and my normal stitch length for the seams (2.5) and increased it (to 3) for the top stitching. I prefer to use iron-on interfacing but I didn’t have any
in my stash so I used a medium sew-in interfacing.
Skills used in this project:
- Machine appliqué
- Learning a new machine stitch
- Free motion embroidery
Step 1: Cutting out
Cut out the following:
Cut out the following:
12” x 8”
patterned cotton fabric (I used Lucky Neco by Moda) (cut 1) and medium
interfacing (cut 1)
 7 ¾” x 8”
cream cotton fabric (cut 1) and medium interfacing (cut 1)
7 ¾” x 8”
cream cotton fabric (cut 1) and medium interfacing (cut 1)
4 ¾” x 8” red
cotton fabric (I used red) and medium interfacing (cut 1)
12” x 8”
lining fabric (cut 2)
Small amount
of cream fabric and heat n bond (or bondaweb) for the appliqué
2" x
3" Zip tabs from the plain coloured fabric (cut 2)
2" x 4"
D ring tabs from the plain coloured fabric (cut 1)
12" zip
1" D
ring
Step 2: Free motion embroidery
 On the right
side of the cream cotton fabric, write your chosen words using a suitable
marker such as an air drying, wash off or friction pen (test the fabric first
to make sure that it can be removed).
On the right
side of the cream cotton fabric, write your chosen words using a suitable
marker such as an air drying, wash off or friction pen (test the fabric first
to make sure that it can be removed).

I wanted to
embroider the words ‘Dorothy’s Bag’ onto the side of the bag to show that it
was made especially for my aunt Dorothy I chose
a font and size I like on the computer and printed it, then traced it onto the
cream fabric using an air drying pen. I
found that the best way of tracing was to hold the printout and fabric against
a window. This made it really easy to
see through the fabric to the writing.
Attach the
interfacing to the wrong side of the cream fabric and either hand or machine
embroider over your chosen words in a thread colour which complements your
other fabrics (I did free motion embroidery after a few practises on some spare
fabric).
Step 3: Appliqué
 Attach the
interfacing to the wrong side of your red cotton fabric
Attach the
interfacing to the wrong side of your red cotton fabric

Draw your
chosen shape onto the matt side of the heat n bond and cut the heat n bond
slightly larger than this shape. It would be fine to cut a rectangle from the
heat n bond with the shape inside it.
Place the shiny
side of the heat n bond against the wrong side of the cream fabric and iron
to attach.
Now cut accurately around
the shape, through the cream cotton fabric and the heat n bond.

Decide where you want to position your
appliqué shape on the red cotton fabric, remove the paper backing from the heat n bond, place the sticky side of the appliqué shape against the right side of the red fabric and iron it in place.
Stitch around
the shape by hand or machine. I used my
machine’s blanket stitch after experimenting on a spare piece of fabric to find
the stitch size that I was happiest with. I chose to use a threat that would blend
in but you might prefer to go for a thread which would really stand out. I hand
embroidered the cat’s features using 2 strands of embroidery floss.
Step 4: Join the decorated side panels

Sew the cream
and red panels you have just embroidered and appliquéd, right sides together,
along the 8” side and press the seam open. Trim the edges to ensure that this piece now measures 12" x 8".
Step 5: Make the zip tabs


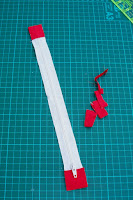


Fold the zip
tabs in half so that the 2” ends meet and press. Turn the raw edges parallel to the fold under
by ¼” and press. Fold them over each end
of the zip and sew across the zip to attach them. Trim the sides so that they are the same
width as the zip.
Step 6: Insert the zip


Pin and sew one side of the bag to one side of the zip to make a zip sandwich. The right side of the decorated side panel will go on the right side of the zip and the lining will be attached to the wrong side of the zip, right side of the fabric facing the zip.

Do the same
for the other lining piece and the Lucky Neco fabric when sewing them to the
other side of the zip.

Top stitch along each side of the zip.
Step 7: Make and attach the D ring tab

Fold the fabric in half lengthways and press. Then fold the sides in so that the raw edges meet the fold and it looks like bias binding. Press. Fold the tab in half so that the short ends meet, insert the D ring tab and sew it to one edge of the bag, raw edges together so that the D ring is facing into the bag. It doesn’t matter which side or whether you attach it to the front or the back.
Step 8: Assemble the bag
Cut out a 1
½” square from each of the 4 bottom corners of the outer fabric and the lining.

Pin the bag
so that the right sides of the outer fabric meet and the right sides of the
lining meet. Sew along the side and
bottom seams, leaving at gap of about 4” along the bottom seam of the lining for
turning. Leave the corner cut outs. Press the seams open.


With the right sides still together, flatten the corners so that each side seam meets the bottom seam to form a straight line. Do this for the outer fabric and lining corners. Sew.
Turn the bag
through and sew up the gap in the lining.


Your bag is
finished and you now have somewhere to keep your small craft items, pens, etc.
No one is going to pick up your bag by mistake because it is completely unique.
Of course, they will pick it up to admire it!


In this project I learnt:
- Machine appliqué is really easy if you take it slowly. I had never used the blanket stitch on my sewing machine and wanted to try it out. I had a practice fiddling with the stitch length and width so that I was happy with the stitch. Then I practised sewing round a heart using scraps of fabric. I had read somewhere that a heart is a good shape to practise on because it has curves and a point. As long as I went slowly the stitch looked good. It made me want to try some of the other stitches on my machine as I have only used the straight stitch so far.
- I wanted to appliqué a cat shape onto the bag as the patterned fabric has a cat theme. I wasn’t confident with my drawing (I’m not much of an artist!), so I had several attempts drawing a cat shape on printer paper. When I was eventually satisfied with my design, I cut it out and drew round it onto the heat n bond. I used cream thread – the same colour as the cat – so that it wouldn’t show if it went wrong, but I needn’t have worried because I was pleased with the end result. Next time, I’m going to try to be bolder and use a bright contrasting thread as I build up my confidence with different stitches.
- I have done a little bit of free motion embroidery on a quilt. It was just random patterns in the same colour thread as the quilt, so it didn’t really show that much. As this was writing and a contrasting thread, it needed to be more accurate. I practised on some scrap fabric first of all and once I’d got the hang of it, I moved on to the bag. I pinned the interfacing to the cream fabric and machine embroidered through both layers as the interfacing stabilises the stitching and prevents the fabric from puckering. I put the embroidery foot on the machine, lowered the feed dogs and followed the words I had traced, going round each letter several times. Some of the letters looked a bit ropey the first time I went round them, but most of them looked better after several rounds.
- I was quite slow and found that the air dry pen which I usually love had begun to fade before I had finished sewing – something to bear in mind for future projects. Next time, I’m going to use a friction pen which disappears when ironed. That way it will be visible for as long as it’s needed. I’ll have to use sew-in interfacing because attaching iron-on interfacing would cause the writing to disappear!
No comments:
Post a Comment