About this blog

I make bags and post tutorials on how to make them. I'll tell you what went well and warn you about any disasters.
Showing posts with label cat. Show all posts

Sunday, 19 June 2016

Bag #24: Wash Bag


I absolutely love making PVC bags.  Although it can be tricky, it is my absolute favourite fabric.  I will be going away for several crafting weekends this summer and I need a wash bag.  A waterproof or water resistant fabric isn't essential but it makes it easier to keep the bag clean.  I wasn't sure whether to go for the budget option and use a bit of shower curtain for the lining (£3 for 180 cm x 180 cm) or go for luxury option and use PUL (£10 for 100 cm x 145 cm) as I had both.  The PVC I used was a really good quality one so I decided to use the PUL and was very pleased with the result - definitely worth the extra expense.  If anyone has tried using a piece of shower curtain as lining, I'd love to hear you comments about whether it was successful or not.

When using PVC, sewing needs to be accurate.  If you have to undo any stitching, you will be left with the needle holes.  For the same reason, I used clips rather than pins to hold the seams together when stitching.  The PVC looks really creased in the photo because I had just finished it but the creases had gone by the next day.

I chose not to use any interfacing/fleece/wadding for the bag body because the PVC was really robust and didn't need it.

For the zip tabs, I used a contrasting light cotton fabric.  It wasn't waterproof as that would have made the zip ends too bulky.

You will need a slightly more than a fat quarter of both PVC and lining, but if you only have a fat quarter, the pattern could easily be shrunk slightly and then it would fit.  The exact amount depends on whether you have a directional print - a 13" or 32 cm length would be plenty regardless of the direction of the print.  The finished size of the bag is 7" high x 8½" wide x 4" deep at the base (approx 16 cm x 21.5 cm x 10 cm).

The PUL was slightly stretchy and I had read that it would need a ball point needed but as I was sewing it in the same seam as the PVC, that wasn't realistic.  I used a normal machine needle for woven fabric and had no problems at all.  My normal stitch length (2.5) was used for the seams and increased it to 3 for the top stitching.  My machine's general purpose foot managed easily and I didn't need a special foot. I used ¼" (6 mm) seams throughout.

I have included metric and imperial measurements but they are not exactly interchangeable, so you should stick to either one or the other.


Skills used in this project:
  • Using PVC
  • Using waterproof lining


Step 1: Cutting out

Cut out the following pieces:

12½" (31.2 cm) across x 9½" (24.2 cm) for the height (Cut 2 PVC and 2 lining)


2" x 3" (5 cm x 7.5 cm) zip tabs (2 contrast fabric/ 2 iron-on light interfacing)

8½" (21 cm) zip (I used an N5 zip cut from a continuous roll)


Step 2: Making the zip tabs

Attach the interfacing to the wrong sides of the zip tabs.

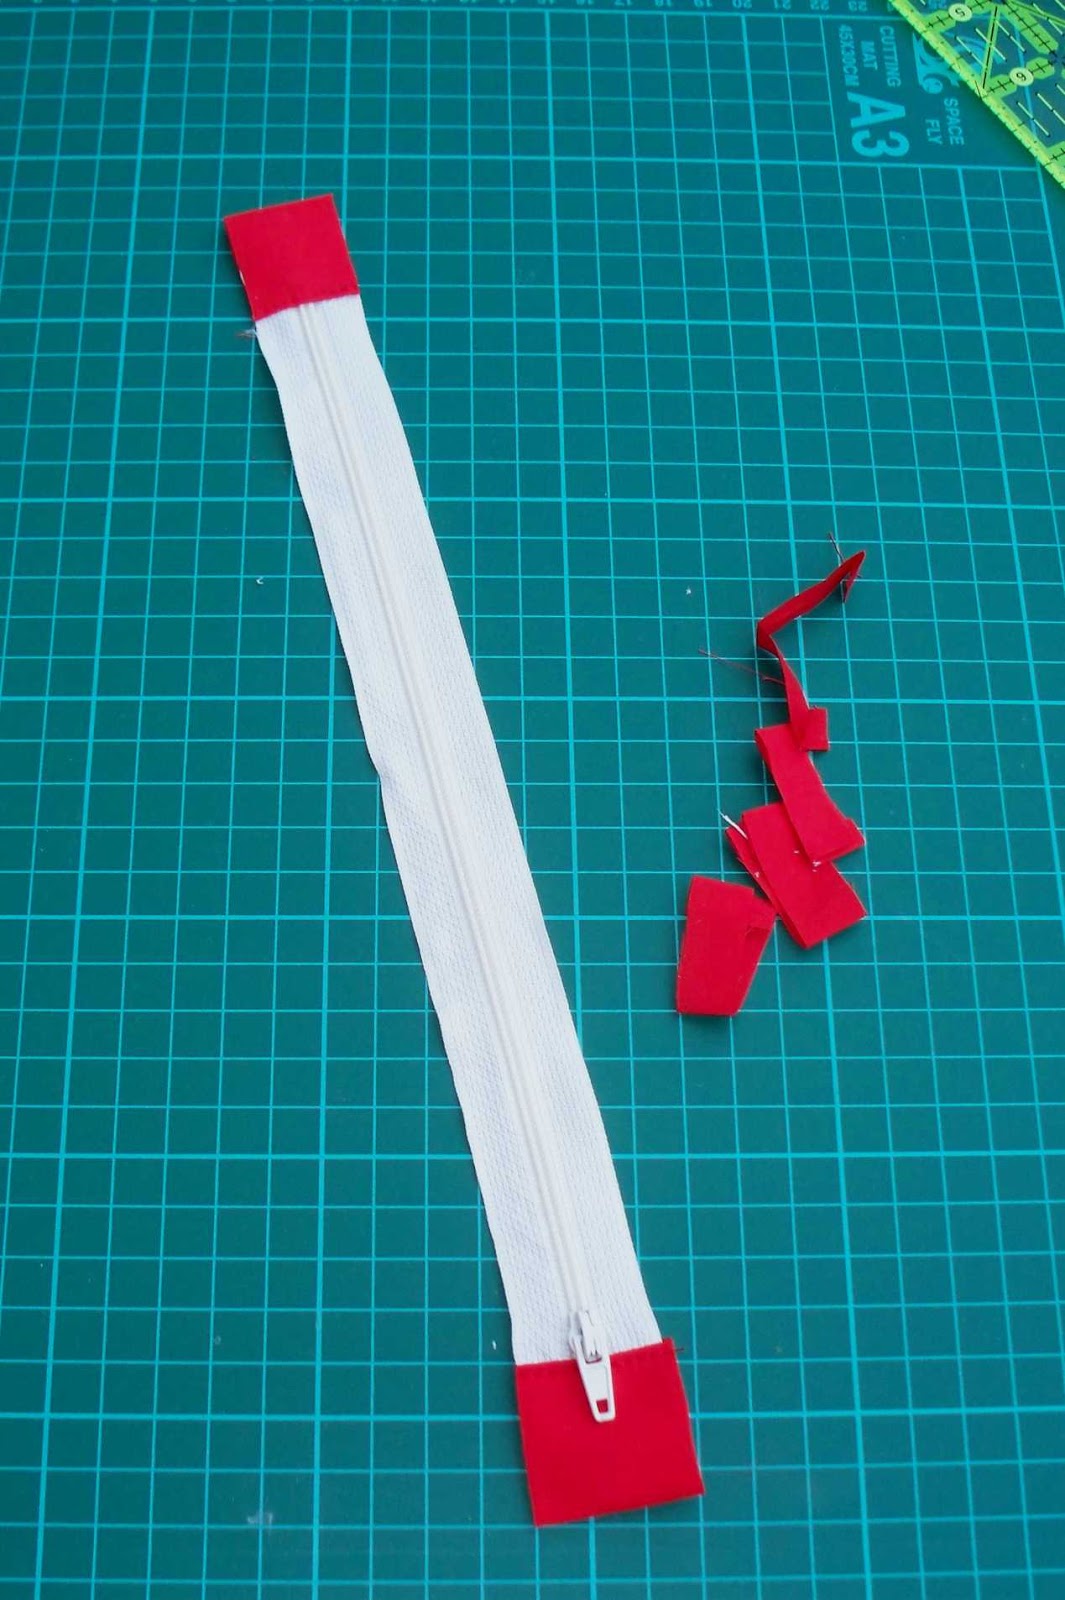
Fold them in half so that the shorter sides meet, wrong sides together and press.  Fold each short end under by ¼" (6 mm) and press.  Place a tab over each end of the zip so that it is sandwiched between the folded over tab - the end of the zip should touch the fold line.  Sew across the open end of each tab to secure it to the zip.  Trim the sides of the tabs so that they are the same width as the zip.


Step 3: Inserting the zip


Place the lining fabric over the PVC, right sides together so that the top edges match.  Put the zip between the fabrics with the top side of the zip (the side with the slider) facing the PVC.  Sew along the top edge of the fabric using a zip foot to attach the zip.

Do the same for the other piece of lining and PVC.


Top stitch along each zip edge for a professional finish and to keep the lining and pvc firmly away from the edges of the zip so that they won't get caught in the zip.


Step 3: Assembling the bag


Spread out the fabric so that the two PVC bag pieces are placed right sides together and the two lining pieces are right sides together.

Open the zip so that you will be able to turn the bag right side out when it is finished.

Sew along the bottom and sides, leaving the corner cut outs unsewn and a 4" (10 cm) gap in the bottom of the lining for turning through. Sew the lining with fractionally larger seams to stop the lining being too baggy.

Flatten the corners and bring the side and bottom seams together so that the seams meet.  Sew across each corner.


Because I was using different colour thread for the lining and PVC, I found it quicker to sew the PVC sides, bottom and corners and then to do the same for the lining after I had changed the thread.

Carefully turn through so that the bag is the right way out.

Sew up the gap in the lining.

Time to go shopping and buy some lovely shiny new toiletries for your mini break.


In this project I learnt:

  • I love using PVC but sometimes it can be hard to sew.  I always use cotton backed PVC but this was far better quality and much easier to sew than my normal PVC.  It shows that you really do get what you pay for.  I had no problem with it sticking or producing erratic stitch lengths as I have sometimes experienced in the past.  When I can afford it, I'm definitely going to buy the best PVC/oilcloth I can afford.
  • I have never used waterproof lining before.  I bought some over a year ago and then completely forgot about it.  PUL has a knit effect on one side and a waterproof laminate on the other.  This makes it slightly stretchy.  I worried that it would snag when I used a machine needle for woven fabrics, but was fine.  Apparently you can seal the seams to make them waterproof but I'm not sure how.  The end result is really professional.  I can't wait to try it out and see how it performs in use.


Sunday, 17 April 2016

Bag #16: Fabric Painted Bags


I really wanted to try out fabric paints on a bag to make it totally unique.  I used them once before, about twenty-five years ago, when I decorated a pair of canvas shoes with fabric pens.  I loved them so much, I wore them until they fell apart.

This time I wanted to try liquid paint but I have absolutely no skill with a paintbrush. I have used a 'You can folk it' series 1 kit on wooden hearts and really liked the effect which was achieved by using dots.  You can find out more about it here: http://www.folkit.co/

I wondered if it would work on fabric and it did.  You can see the effect with the hearts and flowers bag below.

Of course, rather than using someone else's designs, I wanted to create my own designs, keeping them simple in line with my limited ability.

I like long handles on a bag because I prefer to carry it over my shoulder, but if you prefer to carry it in your hands, you can easily make the handles any length you want - that's the joy of making your own bag.

When making the bag, I used my machine's usual stitch length of 2.5 for the seams and increased it to 3 for the top stitching.


Skills used in this project:


  • Using fabric paint
  • French seams


Step 1: Cutting out

Cut out the following from medium to heavyweight calico:
20” x 15” (2 for the bag)
30” x 4” (2  for the handles)
Fabric paint
Round ended tool to make dots (I used an embossing tool)


Step 2: Using fabric paint


Wash and dry the fabric before using paint on it so that any residues are removed which may affect the longevity of the paint.

Draw chosen image onto the fabric.  You can print an image from your computer or draw once yourself.  I drew mine on A4 paper in pencil, went over them in black pen and then placed them under one of the 20" x 15" bag pieces and traced the image onto the bag using light pencil marks which were then painted over.

When you are happy with your image, you will be ready to start painting.  Place a protective layer under the fabric to prevent damage from seepage.  Pour small quantities of the paint onto a plastic tray and use the embossing tool like a paint brush to pick up the paint and make dots on the fabric.  It is a good idea to use a scrap of fabric to practise before decorating the bag.

Where I mixed 2 colours, I put a dot of each colour side by side and swirled them around so that the colours blended. For the dot roses I mixed white and pink paints. For the peacock, I mixed shades of blue and green.

To form the small heart shapes on the heart and peackock, I made 2 dots next to each other and dragged the paint from each of them to form a tail.

I followed the instructions for the fabric paints by leaving the fabric flat for 4 hours. I then made the bag but waited 72 hours before washing to ensure that the paint became permanent.  You should check the instructions for the paint brand you are using and follow them accordingly.


Step 3: Making the bag

I used a French seam to sew the back and front of the bag together because it adds strength and looks more ‘finished’.

Put the two bag pieces together WRONG sides together and sew a narrow hem – about ¼” around the sides and bottom (but not the top) and then trim it back nearer to the line of sewing so that no whiskers of fabric show through the final seam.  Press.

Turn the bag right sides in and press again (making sure that the corners are fully turned out) before sewing the side and bottom seams again using a slightly wider seam (⅜”) which encases the original seam, hiding the raw edges. Press.


Step 4: Making the handles


Fold the handles in half along the entire length to find the middle. Fold the sides of the fabric in towards the centre and press them so that the fabric looks like bias binding. 

To finish the handles fold them in half along the original fold line and sew down both long sides of each handle to give a professional finish. 

  
Step 5: Finishing the top of the bag and attaching the handles

With the wrong sides out, fold the top of the bag over to the outside to form a ½” hem and sew all round the hem   Press.

Turn the hem over again by another inch and pin in place to hold.  Pin the handles to the top of the bag by placing them under the hem and pushing them up so that the end of the handle is placed against the fold of the hem.  They will be upside down at this stage and hang down towards the bottom of the bag.  Measure 3½ “ from the edge of the bag – that is where the outside edge of the handle will go and do the same for the other end of the handle by measuring from the other edge, making sure that the handle isn’t twisted. Sew around the hem, sewing over the handles as you go. Press.  

Flip the handles up so that they are facing the right way and sew a cross to hold each handle in place. Top stitch around the top of the bag, sewing over the handles to create a crisp line.
Wash the bag, inside out, to set the fabric paint.

Well done! Your bag is complete and your are now an artist.  Shopping will be such a joy now with your unique bag. 


In this project I learnt:

  • Using fabric paint was straightforward.  I followed the instructions on the bottles and everything went according to plan. I splashed a bit of green paint on the peacock bag and the instructions said that I should be able to remove it immediately with soap and water but I found that it was impossible to completely remove it.  I know that I need to be much more careful next time. I liked being able to experiment and alter the design as I played with the paints.  The heart and cat both stayed pretty much as planned but the peacock looked a bit bare, so I kept adding more colour until I was happy with the way it looked.  Dotting is such an easy technique - no artistic skill required.  This would be great to do with children, perhaps for a bag to keep their toys in.

  • I used French seams for the first time in bag 1.  This is essentially the same basic bag. This time, I didn't even need to think about how to do them because I understand how they go together.  I love the professional finish they give.

  • I used 3 different weights of calico - a different one for each bag.  The heaviest weight - the heart bag was lovely to work with and beautifully soft but a nightmare to iron.  It will be really strong and last forever.  The other 2 were made from different types of medium weight calico.  They were easy to work with and there were no ironing problems but they won't be as strong as the heart bag. I guess it depends what you want out of your bag and what you will be using it form.  I was going to use interfacing in the handles but they really didn't need it, so in the end I left it out.


Monday, 11 April 2016

Bag #15 : Personalised Bag


My aunt is incredibly generous and I wanted to make this bag to thank her for some lovely gifts.  She is a keen paper crafter who regularly attends classes and workshops, so I thought this bag would be the ideal size to take her pens, scissors, etc. to classes.

She loves animals so I chose an easy cat appliqué which complemented the cat fabric on the other side.  I also added her name in free motion embroidery to personalise it and make it totally unique.  I like the fact that the techniques used in this bag could be used on almost any bag to make it stand out.

I used a ¼” seam allowance throughout and my normal stitch length for the seams (2.5) and increased it (to 3) for the top stitching.  I prefer to use iron-on interfacing but I didn’t have any in my stash so I used a medium sew-in interfacing. 


Skills used in this project:
  • Machine appliqué
  • Learning a new machine stitch
  • Free motion embroidery

Step 1: Cutting out

Cut out the following:

12” x 8” patterned cotton fabric (I used Lucky Neco by Moda) (cut 1) and medium interfacing (cut 1)

7 ¾” x 8” cream cotton fabric (cut 1) and medium interfacing (cut 1)

4 ¾” x 8” red cotton fabric (I used red) and medium interfacing (cut 1)

12” x 8” lining fabric (cut  2)

Small amount of cream fabric and heat n bond (or bondaweb) for the appliqué

2" x 3" Zip tabs from the plain coloured fabric (cut 2)

2" x 4" D ring tabs from the plain coloured fabric (cut 1)

12" zip

1" D ring


Step 2: Free motion embroidery


On the right side of the cream cotton fabric, write your chosen words using a suitable marker such as an air drying, wash off or friction pen (test the fabric first to make sure that it can be removed).

I wanted to embroider the words ‘Dorothy’s Bag’ onto the side of the bag to show that it was made especially for my aunt Dorothy  I chose a font and size I like on the computer and printed it, then traced it onto the cream fabric using an air drying pen.  I found that the best way of tracing was to hold the printout and fabric against a window.  This made it really easy to see through the fabric to the writing.

Attach the interfacing to the wrong side of the cream fabric and either hand or machine embroider over your chosen words in a thread colour which complements your other fabrics (I did free motion embroidery after a few practises on some spare fabric).


Step 3: Appliqué


Attach the interfacing to the wrong side of your red cotton fabric

Draw your chosen shape onto the matt side of the heat n bond and cut the heat n bond slightly larger than this shape. It would be fine to cut a rectangle from the heat n bond with the shape inside it.

Place the shiny side of the heat n bond against the wrong side of the cream fabric and iron to attach. 

Now cut accurately around the shape, through the cream cotton fabric and the heat n bond.

Decide where you want to position your appliqué shape on the red cotton fabric, remove the paper backing from the heat n bond, place the sticky side of the appliqué shape against the right side of the red fabric and iron it in place.

Stitch around the shape by hand or machine.  I used my machine’s blanket stitch after experimenting on a spare piece of fabric to find the stitch size that I was happiest with. I chose to use a threat that would blend in but you might prefer to go for a thread which would really stand out. I hand embroidered the cat’s features using 2 strands of embroidery floss.


Step 4: Join the decorated side panels


Sew the cream and red panels you have just embroidered and appliquéd, right sides together, along the 8” side and press the seam open.  Trim the edges to ensure that this piece now measures 12" x 8".

 
Step 5: Make the zip tabs


Fold the zip tabs in half so that the 2” ends meet and press.  Turn the raw edges parallel to the fold under by ¼” and press.  Fold them over each end of the zip and sew across the zip to attach them.  Trim the sides so that they are the same width as the zip.


Step 6: Insert the zip


Pin and sew one side of the bag to one side of the zip to make a zip sandwich.  The right side of the decorated side panel will go on the right side of the zip and the lining will be attached to the wrong side of the zip, right side of the fabric facing the zip.

   
Do the same for the other lining piece and the Lucky Neco fabric when sewing them to the other side of the zip. 

Top stitch along each side of the zip.


Step 7: Make and attach the D ring tab


Fold the fabric in half lengthways and press.  Then fold the sides in so that the raw edges meet the fold and it looks like bias binding.  Press. Fold the tab in half so that the short ends meet, insert the D ring tab and sew it to one edge of the bag, raw edges together so that the D ring is facing into the bag.  It doesn’t matter which side or whether you attach it to the front or the back.


Step 8: Assemble the bag

Cut out a 1 ½” square from each of the 4 bottom corners of the outer fabric and the lining.


Partly open the zip so that you can turn the bag through to the right side after sewing.

Pin the bag so that the right sides of the outer fabric meet and the right sides of the lining meet.  Sew along the side and bottom seams, leaving at gap of about 4” along the bottom seam of the lining for turning.  Leave the corner cut outs. Press the seams open.


With the right sides still together, flatten the corners so that each side seam meets the bottom seam to form a straight line. Do this for the outer fabric and lining corners.  Sew. 
Turn the bag through and sew up the gap in the lining.


Your bag is finished and you now have somewhere to keep your small craft items, pens, etc.
No one is going to pick up your bag by mistake because it is completely unique. Of course, they will pick it up to admire it!


In this project I learnt:

  • Machine appliqué is really easy if you take it slowly.  I had never used the blanket stitch on my sewing machine and wanted to try it out.  I had a practice fiddling with the stitch length and width so that I was happy with the stitch.  Then I practised sewing round a heart using scraps of fabric.  I had read somewhere that a heart is a good shape to practise on because it has curves and a point.  As long as I went slowly the stitch looked good. It made me want to try some of the other stitches on my machine as I have only used the straight stitch so far.
  • I wanted to appliqué a cat shape onto the bag as the patterned fabric has a cat theme.  I wasn’t confident with my drawing (I’m not much of an artist!), so I had several attempts drawing a cat shape on printer paper.  When I was eventually satisfied with my design, I cut it out and drew round it onto the heat n bond. I used cream thread – the same colour as the cat – so that it wouldn’t show if it went wrong, but I needn’t have worried because I was pleased with the end result.  Next time, I’m going to try to be bolder and use a bright contrasting thread as I build up my confidence with different stitches.
  • I have done a little bit of free motion embroidery on a quilt.  It was just random patterns in the same colour thread as the quilt, so it didn’t really show that much.  As this was writing and a contrasting thread, it needed to be more accurate. I practised on some scrap fabric first of all and once I’d got the hang of it, I moved on to the bag. I pinned the interfacing to the cream fabric and machine embroidered through both layers as the interfacing stabilises the stitching and prevents the fabric from puckering.  I put the embroidery foot on the machine, lowered the feed dogs and followed the words I had traced, going round each letter several times.  Some of the letters looked a bit ropey the first time I went round them, but most of them looked better after several rounds.  
  • I was quite slow and found that the air dry pen which I usually love had begun to fade before I had finished sewing – something to bear in mind for future projects. Next time, I’m going to use a friction pen which disappears when ironed.  That way it will be visible for as long as it’s needed.  I’ll have to use sew-in interfacing because attaching iron-on interfacing would cause the writing to disappear!