About this blog

I make bags and post tutorials on how to make them. I'll tell you what went well and warn you about any disasters.
Showing posts with label sewing. Show all posts

Sunday, 25 December 2016

Bag #51: Metal Frame Bag


I wanted to use a metal frame this week and chose this metal arch frame which I bought in the summer at the Festival of Quilts. I have seen lots of simple bags made using these frames where a square piece of fabric is used and gathered over the frame.  However, I wanted a more fitted appearance so I made sure that the fabric was just the right size to fit the frame.  The great thing about this frame is that it can be unscrewed and used on another bag which makes it good value for money.

I made this using techniques from earlier projects.  For example, the channel which goes over the frame is the same as I would use for a flex frame.  Also, because the frame is hinged, it is similar to making a purse-style bag where you draw round the frame and then add some width at the hinge points so that the bottom of the frame is partially hidden in the finished bag. 

I didn’t add any pockets inside but it would be easy to add a phone or zip pocket. The handle has side rings for a chain or strap.  A narrow shoulder strap made of the patterned fabric/interfacing with swivel clasps at the end would work well. I just wanted this as a handbag so I didn’t bother.

You would need an 11”/28 cm strip of 2 different fabrics or 2 fat quarters, as well as interfacing and wadding.  I used a firm interfacing as I didn’t want the bag to be too floppy and a quilt batting as wadding.

The finished size (excluding the handles) is 9½”/24 cm wide, 8½”/21.5 cm high and 3”/7.5 cm deep at the base  

Skill level: Intermediate.  Although the sewing is straightforward, the pattern may need to be adapted to suit the size of your bag frame (they come in lots of different sizes). 

I used my normal stitch length (2.5) and ¼”/6 mm seams for the outer bag and slighter wider seams for the lining.

I have included metric and imperial measurements but they are not exactly interchangeable, so you should stick to either one or the other.


Skills used in this project:
  • Making darts
  • Using a metal frame

Step 1: Cutting out

Cut out the following:

11” x 6½”/28 x 16 cm Upper Bag Sides (cut 2 patterned fabric)

11” x 3½”/28 cm x 9 cm Lower Bag Sides (cut 2 plain fabric)

11” x 9¾”/28 cm x 25 cm Bag Sides (cut 2 wadding, 2 interfacing, 2 lining)

12” x 1½”/30.5 cm x 4 cm Frame Channel (cut 2 plain fabric, 
2 interfacing)


(This fits a 6”/15 cm wide metal arch frame)


Step 2: Creating the bag’s shape


Here is the 6”/15 cm metal arch frame bag pattern I made for the bag sides. It is too large to scan so I have taken a photo of it.

I marked the shape of the frame onto the paper (the dashes) and then pivoted the frame at one top corner so that the hinge swung out by about 1”/2.5 cm and marked where the hinge sat, then continued the line down.  I did the same for the other top corner of the frame.

Cut the lining, interfacing and wadding to shape – they are all the same size as the whole pattern.

To create the two tone outer bag, I drew a horizontal line across the pattern.  When I cut out the fabric for each part of the bag, I drew round the pattern up to the line and then added ¼”/6 mm for the seam allowance. I did this for the upper bag and also for the lower bag.

This technique can be used to create a pattern for any size frame.


Step 3: Making the bag sides


Sew one lower bag to one upper bag.  Do the same for the other lower and upper bag.  You now have the 2 outer bag sides.

Attach the wadding to the wrong side of the bag sides (I used fabric adhesive spray to stick mine).


With right sides together, make the darts.

Attach the interfacing to the wrong side of the lining. 


Make darts in the lining.


Press the darts.


Step 4: Making the frame channels

Attach the interfacing to the wrong side of the frame channels.


With right sides together, sew the short ends together.  


Turn right sides out and press so that the seam is in the middle. Do this for both frame channels.


Step 5: Attaching the frame channel

Fold the frame channels so that the long raw edges meet. The seam needs to be facing away from the bag fabric so that it will not be visible when sewn up.


When the channel is folded up, the seam is inside
and so won't be visible on the finished bag.

Sew the frame channel to the top edge of the outer bag and the lining.  I found it easier to do this in 2 stages by sewing it first to the right side of the outer bag and then with right sides together, sewing it to the lining so that it is sandwiched between the right sides of the outer bag and lining.

Press.


Step 6: Assembling the bag
Here, one dart faces down and the other
faces up to prevent too much bulk.

Pin the right sides of the outer bag together and do the same for the lining, matching the stitch line for the darts. Fold the darts so that one faces one way and one faces the other to reduce bulk and create a 'nesting' effect.

Make sure the hinge marks are clearly visible (mine aren't in the photo).


Sew from the hinge marks on one side of the outer bag, down towards the bottom of the bag and back up the other side of the outer bag, stopping at the other hinge mark.  Do not sew above the hinge mark at this stage.

Do the same for the lining, leaving a gap of about 4”/10 cm for turning at the base.


Now you need to create the purse-type opening.  Pull the channels out so that the lining/outer fabric meet, right sides still together.  Sew from the frame channel to the hinge mark, making sure not to sew over the frame channel (or you won’t be able to insert the bag handle). Do this at both ends of the frame channels on both sides of the bag.

It can be a bit tricky to get the join right between this stitching and the side seams, so turn it through and check that you are happy with it before finishing the bag.

Turn through and sew up the opening in the lining.  Press.


Slide the bag handles through the channels.  


Your bag is now finished just in time for the sales.  It won't carry all your bargains but you'll have something unique.


In this project I learnt:
  • I have used darts in a previous bag.  They are easy to do and a simple way of creating that lovely curved shape at the base and sides.  I planned to use them more often but then completely forgot about them.  I’m so glad I finally remembered them!
  • I haven’t used this style of metal frame before but it was certainly useful to have used flex and purse frames before because the top of this bag is a combination of the two. The contrasting frame channel worked really and fitted nicely.  I initially forgot about the opening and sewed all round the sides.  When I turned it through, I realised immediately that the only opening was between the channels at the top.  Not much point having a hinged opening if you’re going to sew it closed!  I had to unpick the stitches and instead of sewing outer fabric to outer fabric at the top of the bag, I sewed outer fabric to corresponding lining.  When I turned it through, it fitted the frame perfectly but I had a hole at each of the hinges where I hadn’t sewn right up to the side seam.  I had to turn it back and sew up the hole.  Hopefully I won’t make this mistake again.
  • I don’t press my fabric enough and that’s why I forget to include it in the instructions.  This time I remembered! I’m sure the final bag is better for it.


Sunday, 27 November 2016

Bag #47: Sequin Zip Up Evening Bag


As I was short of time this week, I decided to use last week’s sequin fabric again to make a zip bag.  It is very quick to make because it’s just like making a pencil case, but I raised the fabric around the zip to conceal it.

The sequins were attached to a see-through net fabric, so I used a cheap cotton poplin backing fabric between the sequins and the wadding.  If you are using a more solid sequin fabric, this won’t be necessary.

Be prepared for a mess – you will be picking up bits of sequins for weeks to come.  Luckily, this bag only has 2 sequin pieces. I have heard that sequins often break and that you should wear eye protection and use a leather needle.  I did both of these and sewed much more slowly than normal and my needle didn’t break at all.

I included one internal pocket which was quite large and used a contrasting fabric.  It doesn’t do up and isn’t quite big enough for a phone.  I intend to slip my credit cards in there and a mirror.  You could re-size the pocket to suit your needs and add a closure if you wanted more security.  For example, you could add a pleat at each side for something bulking or make it smaller or add a magnetic clasp.  I think if I were making it again, I would make the pocket a bit smaller.  However, I’ve left the measurements the same and you can make your own choice.  It’s added once the bag is ready for assembly, so you’ll be able to judge what it will look like.

This bag is slightly too large for fat quarters (unless they are generously cut – I think it depends whether they are imperial or metric?? When I buy them, they often come up small than the measurements on the packaging), but if you made it fractionally smaller, you would need a fat quarter of each fabric.  If you stick with my measurements, you would need a 10”/25.5 cm strip of each fabric.

The finished size is 9” x 7”/23 cm x 18 cm.

Skill level: Intermediate because concealing a zip without using a separate piece of fabric for the zip area requires some sewing experience.

I used a leather needle (it’s strong and less likely to break if it hits a sequin) and my normal stitch length (2.5) throughout but increased it to 4 for top stitching over the sequins.  I used ¼”/6mm seams for the outer bag and slighter wider seams for the lining.

I have included metric and imperial measurements but they are not exactly interchangeable, so you should stick to either one or the other.


Skills used in this project:
  • Using sequin fabric
  • Creating a concealed zip by manipulating the side panel


Step 1: Cutting out

Cut out the following:

10” x 9½”/25.5 cm x 24 cm Outer Bag sides (cut 2 sequin fabric, 2 backing fabric, 2 wadding)

10” x 7½/25.5.cm x 19 cm Inner Bag sides (cut 2 lining, 2 medium weight interfacing)

10” x 6”/25.5.cm x 15 cm Internal Pocket (cut 1 lining) but note my comments above

5” x 6”/12.5 cm x 15 cm Internal Pocket (cut 1 interfacing)

9”/23 cm zip (I used an N5 zip from a continuous roll)

2” x 2” handle tabs

2 x ½”/12 mm D or O ring for the handle tabs (optional)


45”/114 cm Chain (but measure and adjust for your height/preference) 


Step 2: Attaching the zip

Attach the interfacing to the wrong side of the bag lining.

Join the wadding, backing and sequin fabrics to make the outer bag body (I used iron-on wadding which I attached to the wrong side of the black backing fabric and then placed the sequin fabric over the top and sewed all round the edges).

If using a zip from a continuous roll, sew a couple of stitches across each end of the zip to ensure the slider doesn’t come off during the sewing process.


Place one outer bag body and one lining, right sides together.  Slip the zip between them so that the slider faces the outer fabric.  Sew to one side of the zip using a zip foot.

Do the same for the other lining piece and the outer fabric when sewing them to the other side of the zip. 

My zip was a bit too short so I have amended the instructions -
yours will be a bit longer but won't be as wide as the bag sides.

Top stitch along each side of the zip for a professional appearance and to prevent the fabric getting caught in the zip. Do not sew as close to the edge of the fabric as you normally would or the sequins will not lay flat.


Step 3: Shaping the top


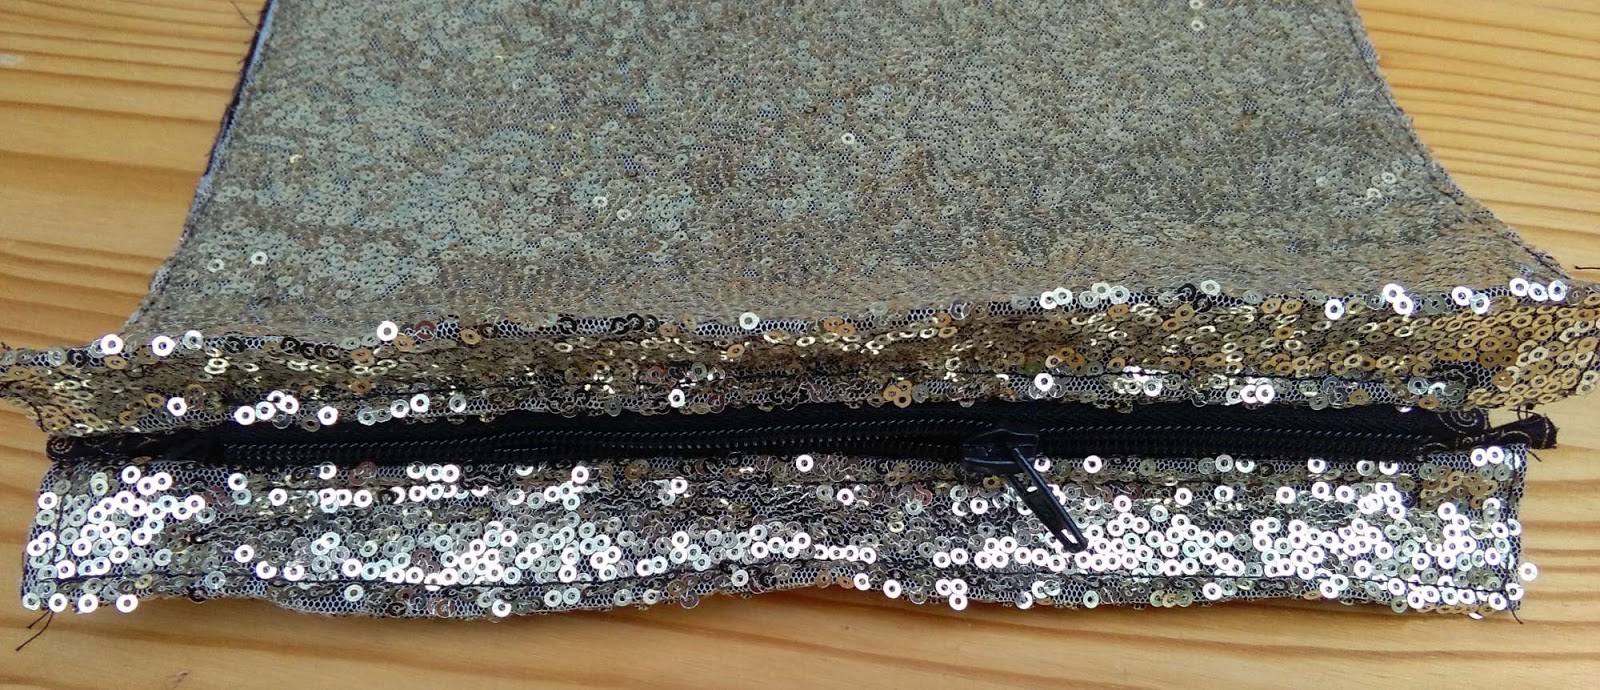
Measure 1”/2.5 cm from the fabric edge where it joins the zip.  This will form the top of the bag as the zip is concealed. Fold the outer (sequin) fabric along this line on both sides of the bag with the sequins facing out and top stitch along (as shown in the photo).  Keep the lining out of the way - that isn't involved at all.
Follow the line of the pin to sew a diagonal line
from the zip (pin head) to the top edge (pin tip).

On the wrong side of the fabric, sew a diagonal line from the zip to the top edge of the bag. 

Overlap the zip by about ½”/12 mm.  This will create shape within the zip area and hold the ends of the zip firmly in place.


Step 4: Making the internal pocket

Attach the interfacing to the wrong side of the pocket fabric at one end (it is half the size of the pocket). 


Fold the fabric over, right sides together and sew around the open sides, leaving a gap for turning.

Turn through and press.

Place the pocket on the right side of one of the bag lining pieces just below the zip with the turning edge at the bottom.  Sew around the sides and bottom, closing up the turning hole as you sew over it.


Step 5: Making the handle tabs

(I made my tabs longer than needed – 3” x 2”/ 7.5 cm x 5 cm – but I ended up cutting them shorter, so I have amended cutting instructions to make them  2” x 2”/ 5 cm x 5 cm).

Fold the handle tabs in half to find the centre.  Fold each side in so that the edge is against the fold line.  It will now look like bias binding.  Fold in half and top stitch close to the edge along both long sides.  This will hold it together and make it look professional.

Fold in half so that the raw edges meet. If you plan to add a D ring or any other hardware to hold your bag handle, attach it now.


Sew the tabs onto the right side of one of the sequin bag sides, near the top with the raw edges facing out.


Step 6: Assembling the bag

Make sure the zip is open.


With the outer bag sides together and the lining pieces together (right sides together), sew all round leaving a gap in the bottom of the lining for turning.

Turn through and sew up the turning gap.

Attach the chain to handle tabs.  You can buy bag chains with swivel hooks attached which you can just clip onto the tabs. (I have just ordered a bag chain from ebay, but until it arrives I'm using a chain from the local hardware store secured with a couple of jewellery split rings).


Well done!  Your glamorous sequin bag is ready for the Christmas party season. There just room in there for a small sprig of mistletoe – you don’t want to miss an opportunity, do you?


In this project I learnt:


  • This sequin fabric was easy to use due to the small sequins (as I found when I made the sequin clutch last week).  Without the thickness of the bag foam, it was even easier to sew.  This time I sewed the sequin fabric to the wadding as it was trying to make a getaway. That made assembling the bag much easier as I didn’t have to keep checking that I had sewn through all the layers.  It took a bit longer but saved time in the process.
  • Rather than use separate strips of fabric around the zip, I decided to make the bag sides slightly longer and add a fold. I didn’t want to cut the sequin fabric any more than necessary because it makes such a mess.  It worked on this fabric because it was quite pliable, but I doubt if it would work with more rigid fabric or if using bag foam. 
  • If I had gold D rings, I would have attached them to the tabs.  It doesn't matter because a swivel or lobster clasp will hold on to the tabs just fine.  As I mentioned above, I used a length of chain from a DIY store but I will replace that when the chain handle I have ordered arrives.
  • My zip was a bit short so I have increased the size of the zip and decreased the length of the handle tabs as they were too long. The pocket was probably a bit of an odd size – too small for a phone, too big for just credit cards.  I haven’t changed its measurements, but as its added right near the end, it can easily be altered if its not a good size for you.   


Sunday, 20 November 2016

Bag #46: Sequin Clutch


I saw this sequin fabric in the remnant bin at my local fabric store and snapped it up, but I wasn’t sure what to do with it.  A simple zip pouch would look great and I still might do that, but I wanted more of a challenge, so I opted for this faux suede and sequin clutch with a cotton lining.  It has an internal zip pocket, but no strap.  If you wanted a strap, you could easily add tabs with D rings to either side of the flap just above where it joins the main body of the bag.  A gold chain would look great.

The sequins were attached to a net fabric which was quite see-through and flimsy, so I used a piece of plain cotton fabric behind the sequins.

I did some research on the internet about using sequin fabric and read lots of cautionary tales.  I followed the general advice and used a leather needle and wore protective glasses in case the sequins caused the needle to break (it didn’t) and cut the fabric with an old pair of scissors to avoid damaging my good ones.  The sequins made a terrible mess – I think I will be finding bits of sequin in the carpet for months to come.  

The most you need is an 11”/28 cm strip or fat quarter (if you use non-directional fabric) of any of the fabrics - faux suede, lining, foam and 6”/15 cm of the sequin fabric.

I used a firm iron-on interfacing to stabilise the lining/internal pocket, bag foam for the main body of the bag and the flap and a thin wadding for the sides to prevent too much bulk.

The finished size is approximately 10½”/26.5 cm wide, 7”/18 cm high and 1½/ 4 cm deep

Skill level: Intermediate – due to the thickness of the foam, this takes a lot of manipulation to sew through all the layers.  Sequin fabric can be tricky, so some experience with a range of fabrics would be useful.

I used my normal needle and stitch length (2.5) when sewing the lining, but I used a leather needle and increased the stitch length when sewing the outer bag to 4 when sewing the seams and 5 when top stitching.  I tried to use ¼”/6 mm seams for the outer bag although sometimes they were a little wider due to the thickness of the foam. However, I recommend wider seams to ensure that all the fabrics are sewn through – I’m just so used to using narrow seams that I do it without thinking.  I made sure that I used slighter wider seams for the lining.


I have included metric and imperial measurements but they are not exactly interchangeable, so you should stick to either one or the other.


Skills used in this project:
  • Working with sequin fabric


Step 1: Cutting out

Cut out the following:

11” x 14”/ 28 cm x 35.5 cm Bag body (cut 1 faux suede, 1 foam, 1 lining, 1 interfacing)

6” x 2”/ 15 cm x 5 cm Bag sides (cut 2 faux suede, 2 wadding, 2 lining, 2 interfacing) – shape them so that one of the short sides is curved – I drew round an old cotton reel

11” x 6”/28 cm x 15 cm Flap (cut 1 sequin fabric, 1 foam, 1 lining, 1 interfacing)

9” x 6”/23 cm x 15 cm Internal pocket (cut 2 lining, 2 interfacing)

9” zip/ 23 cm (I used an N3 zip from a continuous roll, but a 8”/20 cm zip would be sufficient)

2 magnetic clasps 


Step 2: Making the internal zip pocket

Attach interfacing to wrong side of all lining and pocket pieces.


Pin one pocket piece to one of the bag linings, right sides together, with the long side of the pocket placed centrally along the top edge of the lining.  

Draw a ½” x 7”/12 mm x 18 cm rectangle along the centre of the interfacing which is attached to one of the pocket pieces.  Sew around this rectangle through all the layers that you have just pinned together.  


Cut a slit in this rectangle (as shown in the photo) making sure not to cut the stitches. 


Push the pocket through this ‘letterbox’ shape in the lining so that it sits flat and press. You will now have a neat opening to attach the zip.


Pin the zip to the pocket so that the right side shows through the aperture in the bag lining.  Sew all round.


Pin the remaining pocket piece to this one, right sides together and sew around the sides and bottom, keeping the bag lining out of the way as you do not want to sew through this. 

Sew along the top of the pocket and the bag lining to hold the pocket firmly in place.


Step 3: Making the lining


With right sides together, sew the lining body to one of the lining sides starting at the front (furthest away from the pocket).  You may have up to ½”/12 mm of the lining body left over once you have sewn it to the side. Don’t worry about this because measurements vary depending on the size of the curves you created in the side. You will trim away any excess once you have made the lining.

Do the same for the other lining side, again starting at the front.

Trim away any excess back fabric, as mentioned above.


Step 4: Making the outer bag

Attach the foam to the faux suede body and the wadding to the faux suede sides. I used a spray on fabric adhesive but they could just be pinned.


With right sides together, join the sides to the body as you did for the lining, starting at what will be the bag front and trimming away any excess fabric on the back.

Trim the foam back as close to the stitch line as you can.


Step 5: Making the flap

Attach the foam to the wrong side of the black cotton flap fabric and place the sequin fabric onto the black with the sequin side facing out.

Attach the interfacing to the wrong side of the flap lining.


With right sides together, join the lining to the sequin flap by sewing around the 2 short sides and one of the long sides. 

Trim the foam back as close to the stitch line as you can.

Turn right sides out.


Step 6: Attaching the magnetic fasteners


The thinner side of the magnetic fastener needs to be attached to the lining of the flap. I placed them about 1”/2.5 cm from the seams on each corner.  I used a small off cut of bag foam on the wrong side of the lining to give it extra stability.   Make 2 holes in the lining and foam, push the ‘legs’ through from the right side of the lining, through the foam and the washer and open them outwards to secure.

Pin the flap to the back of the bag along the top with right sides together (see step 7 below).
  Fold the flap towards the front to work out where the magnetic clasps will go so that they meet.  Attach the thicker side of the fastener to the right side of the bag front.  There is no need to add extra foam because the faux suede already has foam attached to it.


Step 7: Attaching the flap


Sew the flap to the back of the bag with right sides together, through all layers of the flap.


Step 8: Assembling the bag

The lining needs to have the wrong side facing out and the faux suede bag needs to have its right side facing out. 


Place the faux suede bag inside the lining bag, matching the tops of the bags. 

The flap needs to be folded down between the outer bag and lining so that the join with the outer bag is visible.

Sew all round leaving a gap of about 5”/12.5 cm for turning.


Turn right side out and top stitch all round the top seam where you joined the bag and lining, closing the gap when you reach it.

(I would usually top stitch around the flap but I tried it and it looked horrible, so I unpicked the stitches.)


Step 9: Adding sequins

The sequins break around the seam line and you may end up with bald patches.  Apparently this is normal when sewing with sequin fabric.  One corner of my front flap was a bit bald and I might add some extra sequins there.  If it bothers you, take a few sequins from any leftover fabric and sew them on to fill in any gaps.


Congratulations!  You now have a fancy evening bag, but where are you going to go to show it off?


In this project I learnt:
  • The sequin fabric was easy to work with.  I used a leather needle which could withstand hitting the sequins, but they were so small that the needle just pushed them out of the way.  Perhaps if they were larger, I would have had problems.  Most people use this fabric for clothing and have to remove the sequins from the seams, but this wasn’t necessary for bag making.  The biggest problem was the mess they made.  Wherever I went, I left a trail of gold!   The only problem I experienced was when top stitching where the flap joined the bag in step 8.  The needle kept hitting sequins and stopping but no breakage and I adjusted the fabric slightly and carried on.
  • My main difficulty was the thickness of the bag foam at the seams but I went really slowly and, although my sewing machine struggled, it got there in the end.
  • I’ll definitely use sequin fabric again as it adds a touch of glamour to a bag, especially at this time of year. Now I just need to find somewhere glamorous to go!