About this blog

I make bags and post tutorials on how to make them. I'll tell you what went well and warn you about any disasters.
Showing posts with label zip pouch. Show all posts

Tuesday, 2 January 2018

Waterproof Wash Bag


I made this bag as a Christmas present for my Dad.  He wanted a 9" x 6" bag to store miniature toiletries when travelling.  I chose this cotton backed PVC fabric as it seemed quite masculine and fitted in with the travel theme.  I lined it with a waterproof fabric which I already had in my stash (PUL - polyurethane laminate).  It has a flat base, so it stands up by itself and has a zip closure.  I wanted it to have a rectangular shape once completed which meant making the bottom edge wider than the top edge to allow for the extra depth at the base.


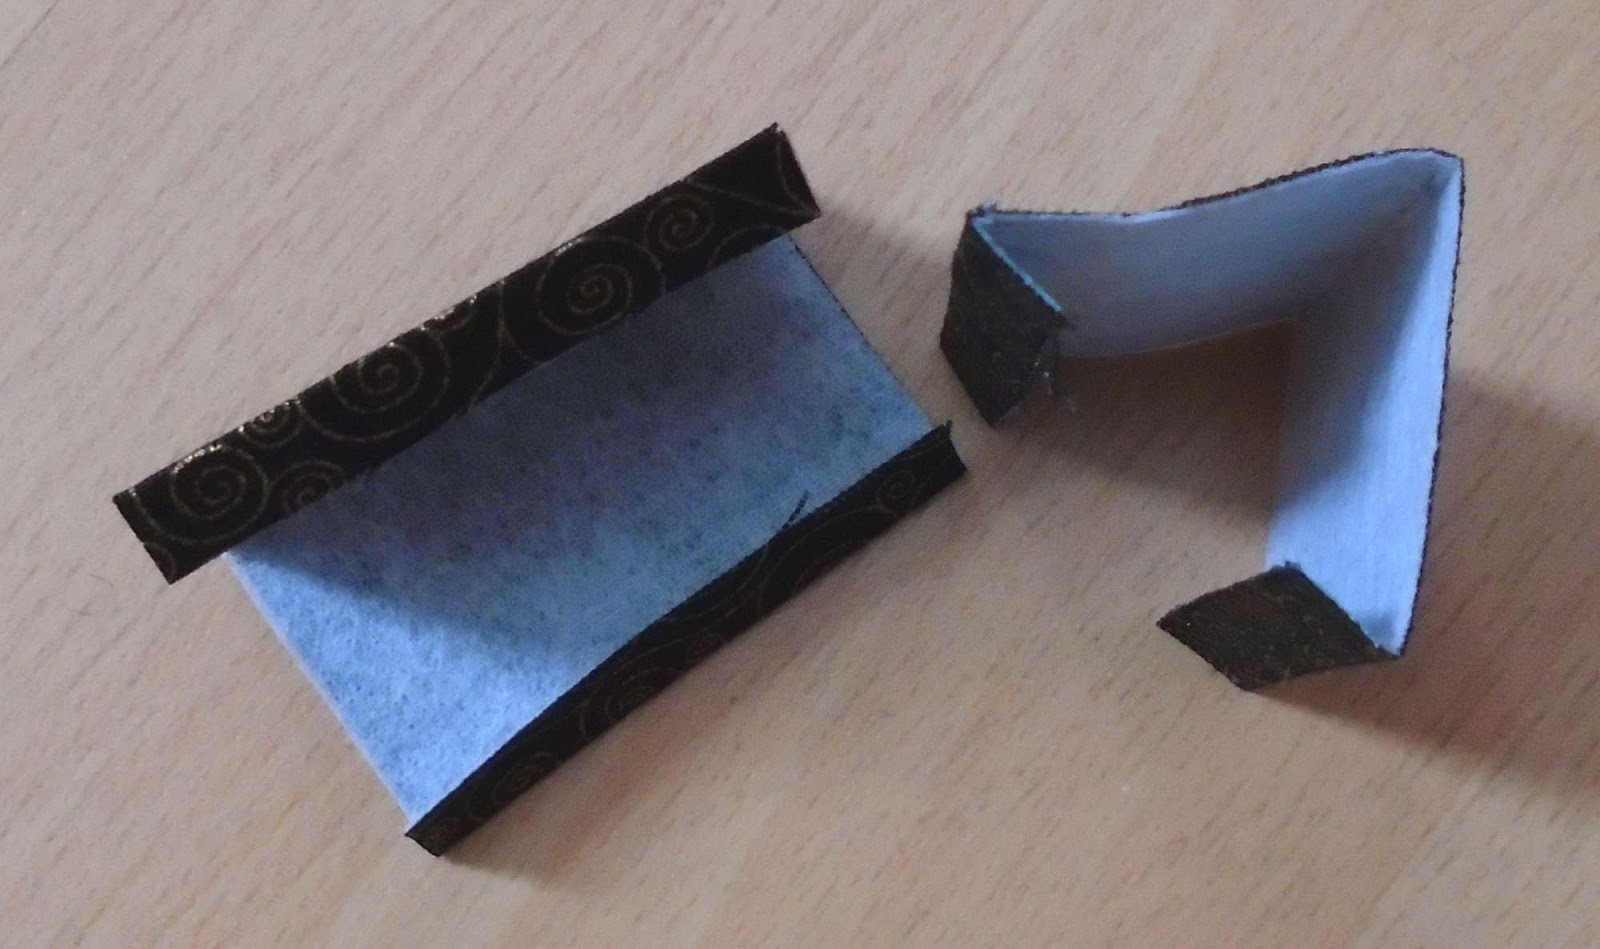
I made the zip tabs differently this time.  Usually I make them so that they join up with the side seam, but I've noticed that commercially made bags have a shorter zip and a slight gap between the side seam and where the zip starts to avoid the bulk you can get in the corners.  I didn't know how much shorter to make the zip so I guessed at ½" shorter than the width of the bag and covered each end of it with very narrow zip tabs, as shown in the photo.


Then I sewed up the side seams, ensuring that I didn't sew into the tabs.   I really like the result. Not only is it easier to make, but it also looks better.  If I was doing it again, I would probably make the zip even shorter to keep the top corners more square.

I wasn't sure how deep to make the bag, so I waited until I had sewn all the edge seams before sewing across the corners to create the flat base.  It was harder to do, but enabled me to put off the decision until I had a better idea of what the bag looked like.

I was very happy with the end result.  More importantly, so was my Dad.

Sunday, 27 November 2016

Bag #47: Sequin Zip Up Evening Bag


As I was short of time this week, I decided to use last week’s sequin fabric again to make a zip bag.  It is very quick to make because it’s just like making a pencil case, but I raised the fabric around the zip to conceal it.

The sequins were attached to a see-through net fabric, so I used a cheap cotton poplin backing fabric between the sequins and the wadding.  If you are using a more solid sequin fabric, this won’t be necessary.

Be prepared for a mess – you will be picking up bits of sequins for weeks to come.  Luckily, this bag only has 2 sequin pieces. I have heard that sequins often break and that you should wear eye protection and use a leather needle.  I did both of these and sewed much more slowly than normal and my needle didn’t break at all.

I included one internal pocket which was quite large and used a contrasting fabric.  It doesn’t do up and isn’t quite big enough for a phone.  I intend to slip my credit cards in there and a mirror.  You could re-size the pocket to suit your needs and add a closure if you wanted more security.  For example, you could add a pleat at each side for something bulking or make it smaller or add a magnetic clasp.  I think if I were making it again, I would make the pocket a bit smaller.  However, I’ve left the measurements the same and you can make your own choice.  It’s added once the bag is ready for assembly, so you’ll be able to judge what it will look like.

This bag is slightly too large for fat quarters (unless they are generously cut – I think it depends whether they are imperial or metric?? When I buy them, they often come up small than the measurements on the packaging), but if you made it fractionally smaller, you would need a fat quarter of each fabric.  If you stick with my measurements, you would need a 10”/25.5 cm strip of each fabric.

The finished size is 9” x 7”/23 cm x 18 cm.

Skill level: Intermediate because concealing a zip without using a separate piece of fabric for the zip area requires some sewing experience.

I used a leather needle (it’s strong and less likely to break if it hits a sequin) and my normal stitch length (2.5) throughout but increased it to 4 for top stitching over the sequins.  I used ¼”/6mm seams for the outer bag and slighter wider seams for the lining.

I have included metric and imperial measurements but they are not exactly interchangeable, so you should stick to either one or the other.


Skills used in this project:
  • Using sequin fabric
  • Creating a concealed zip by manipulating the side panel


Step 1: Cutting out

Cut out the following:

10” x 9½”/25.5 cm x 24 cm Outer Bag sides (cut 2 sequin fabric, 2 backing fabric, 2 wadding)

10” x 7½/25.5.cm x 19 cm Inner Bag sides (cut 2 lining, 2 medium weight interfacing)

10” x 6”/25.5.cm x 15 cm Internal Pocket (cut 1 lining) but note my comments above

5” x 6”/12.5 cm x 15 cm Internal Pocket (cut 1 interfacing)

9”/23 cm zip (I used an N5 zip from a continuous roll)

2” x 2” handle tabs

2 x ½”/12 mm D or O ring for the handle tabs (optional)


45”/114 cm Chain (but measure and adjust for your height/preference) 


Step 2: Attaching the zip

Attach the interfacing to the wrong side of the bag lining.

Join the wadding, backing and sequin fabrics to make the outer bag body (I used iron-on wadding which I attached to the wrong side of the black backing fabric and then placed the sequin fabric over the top and sewed all round the edges).

If using a zip from a continuous roll, sew a couple of stitches across each end of the zip to ensure the slider doesn’t come off during the sewing process.


Place one outer bag body and one lining, right sides together.  Slip the zip between them so that the slider faces the outer fabric.  Sew to one side of the zip using a zip foot.

Do the same for the other lining piece and the outer fabric when sewing them to the other side of the zip. 

My zip was a bit too short so I have amended the instructions -
yours will be a bit longer but won't be as wide as the bag sides.

Top stitch along each side of the zip for a professional appearance and to prevent the fabric getting caught in the zip. Do not sew as close to the edge of the fabric as you normally would or the sequins will not lay flat.


Step 3: Shaping the top


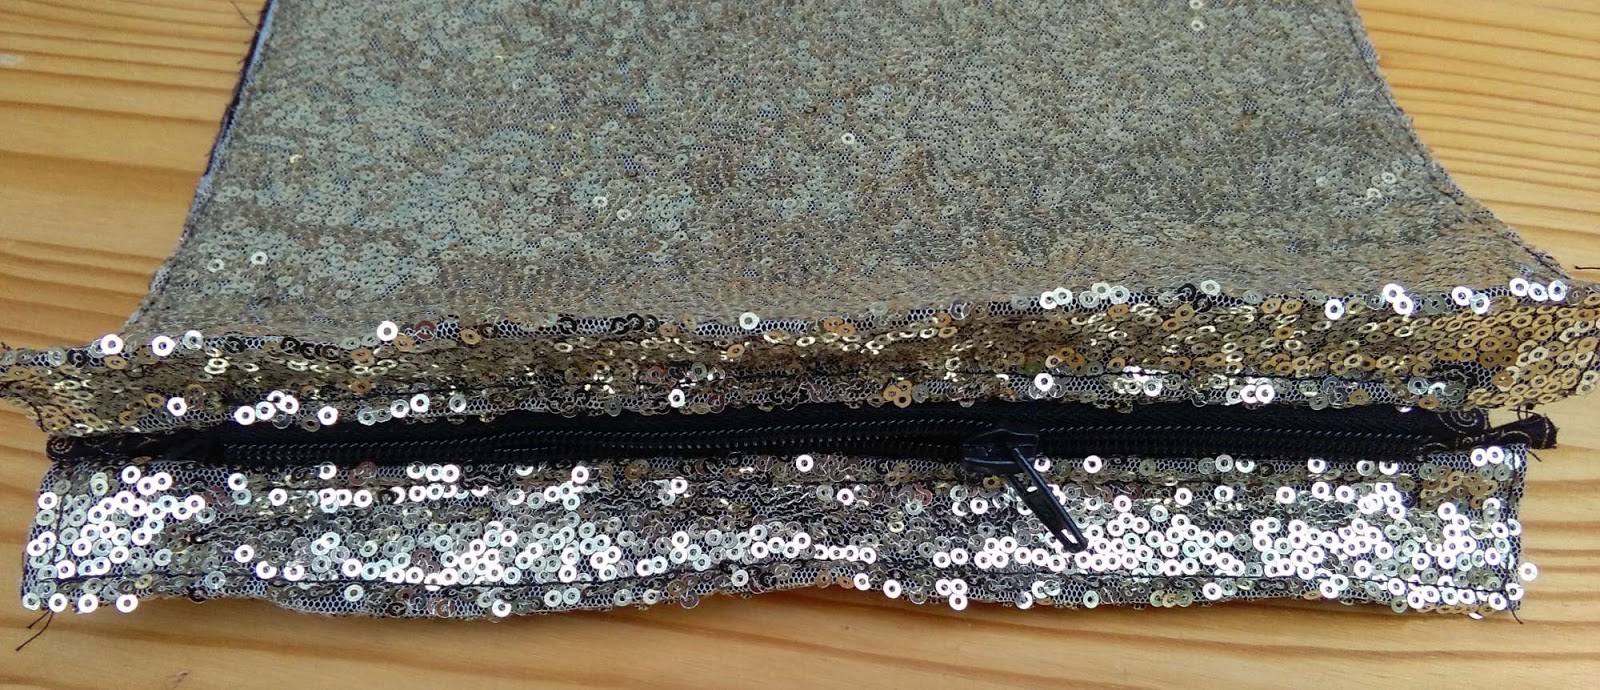
Measure 1”/2.5 cm from the fabric edge where it joins the zip.  This will form the top of the bag as the zip is concealed. Fold the outer (sequin) fabric along this line on both sides of the bag with the sequins facing out and top stitch along (as shown in the photo).  Keep the lining out of the way - that isn't involved at all.
Follow the line of the pin to sew a diagonal line
from the zip (pin head) to the top edge (pin tip).

On the wrong side of the fabric, sew a diagonal line from the zip to the top edge of the bag. 

Overlap the zip by about ½”/12 mm.  This will create shape within the zip area and hold the ends of the zip firmly in place.


Step 4: Making the internal pocket

Attach the interfacing to the wrong side of the pocket fabric at one end (it is half the size of the pocket). 


Fold the fabric over, right sides together and sew around the open sides, leaving a gap for turning.

Turn through and press.

Place the pocket on the right side of one of the bag lining pieces just below the zip with the turning edge at the bottom.  Sew around the sides and bottom, closing up the turning hole as you sew over it.


Step 5: Making the handle tabs

(I made my tabs longer than needed – 3” x 2”/ 7.5 cm x 5 cm – but I ended up cutting them shorter, so I have amended cutting instructions to make them  2” x 2”/ 5 cm x 5 cm).

Fold the handle tabs in half to find the centre.  Fold each side in so that the edge is against the fold line.  It will now look like bias binding.  Fold in half and top stitch close to the edge along both long sides.  This will hold it together and make it look professional.

Fold in half so that the raw edges meet. If you plan to add a D ring or any other hardware to hold your bag handle, attach it now.


Sew the tabs onto the right side of one of the sequin bag sides, near the top with the raw edges facing out.


Step 6: Assembling the bag

Make sure the zip is open.


With the outer bag sides together and the lining pieces together (right sides together), sew all round leaving a gap in the bottom of the lining for turning.

Turn through and sew up the turning gap.

Attach the chain to handle tabs.  You can buy bag chains with swivel hooks attached which you can just clip onto the tabs. (I have just ordered a bag chain from ebay, but until it arrives I'm using a chain from the local hardware store secured with a couple of jewellery split rings).


Well done!  Your glamorous sequin bag is ready for the Christmas party season. There just room in there for a small sprig of mistletoe – you don’t want to miss an opportunity, do you?


In this project I learnt:


  • This sequin fabric was easy to use due to the small sequins (as I found when I made the sequin clutch last week).  Without the thickness of the bag foam, it was even easier to sew.  This time I sewed the sequin fabric to the wadding as it was trying to make a getaway. That made assembling the bag much easier as I didn’t have to keep checking that I had sewn through all the layers.  It took a bit longer but saved time in the process.
  • Rather than use separate strips of fabric around the zip, I decided to make the bag sides slightly longer and add a fold. I didn’t want to cut the sequin fabric any more than necessary because it makes such a mess.  It worked on this fabric because it was quite pliable, but I doubt if it would work with more rigid fabric or if using bag foam. 
  • If I had gold D rings, I would have attached them to the tabs.  It doesn't matter because a swivel or lobster clasp will hold on to the tabs just fine.  As I mentioned above, I used a length of chain from a DIY store but I will replace that when the chain handle I have ordered arrives.
  • My zip was a bit short so I have increased the size of the zip and decreased the length of the handle tabs as they were too long. The pocket was probably a bit of an odd size – too small for a phone, too big for just credit cards.  I haven’t changed its measurements, but as its added right near the end, it can easily be altered if its not a good size for you.   


Sunday, 13 November 2016

Bag #45: Two Tone Zip Clutch Bag


I wanted a small clutch bag to slip into my tote bag when I go to work or shopping – no handles, no pockets and just big enough to hold my valuables – purse, phone, credit cards, keys. I used black and tan faux leather with a black zip and black/gold cotton lining.  A wrist strap or narrow shoulder strap could easily be added via side tabs.

This is lovely quality faux leather which I bought online from U-handbag earlier this year.  It is not too thick which makes it beautifully supple, but soft and durable.

To make this bag you would need 6”/15 cm strips of faux leather in two colours, fat quarter for lining, 9½”/24 cm strip of lightweight iron-on interfacing and wadding.  I used F220 interfacing and quilt batting.  

The finished size is approx 8”/20 cm wide, 8”/20 cm high and 1”/2.5 cm deep.

Skill level: Easy but some experience of using faux leather would be an advantage.

I increased my normal stitch length by varying amounts depending on the thickness of the seams.  It varied from 3.5 -5.  I used ½”/12mm seams for the outer bag and slighter wider seams for the lining.

I have included metric and imperial measurements but they are not exactly interchangeable, so you should stick to either one or the other.


Skills used in this project:
  • Using faux leather

Step 1: Cutting out

Cut out the following:

9½” x 6”/24 cm x 15 cm Upper bag sides (cut 2 faux leather)

9½” x 4”/24 cm x 10 cm Lower bag sides (cut 2 faux leather)

9½” x 9”/24 cm x 23 cm Inner bag (cut 2 cotton lining, 2 interfacing, 2 wadding)

3” x 2”/7.5 cm x 5 cm zip tabs (cut 2 cotton lining, 2 interfacing)

8½”/ 21.5 cm zip – I used an N5 zip cut from a continuous roll and added a gold slider


Step 2: Making the bag sides


Sew one lower bag side to one upper bag side along the long edge.  Avoid pinning because the pin marks will remain visible – instead it is better to use clips to hold the faux leather in place. I found that using a leather needle and a slightly longer stitch length than usual (3.5)

Do the same for the other lower and upper bag sides.


Fold the seam towards the upper bag and top stitch parallel to the seam to hold it firmly in place. I increased my stitch length to 4 for this top stitching.  Do this for both bag sides.


Step 3: Making the zip tabs

Attach the interfacing to the wrong side of the zip tabs.


Fold the tabs in half so that the shorter edges meet.  Press.  Fold the shorter edges under by ¼”/ 6 mm and press.  


Wrap a tab around each end of the zip, overlapping the end of the zip by about ½”/12 mm and sew across the open end of the tab to secure.  Trim the tabs so that they are the same width as the zip. 


Step 4: Inserting the zip

Place one piece of wadding on the wrong side of one of the faux leather bag sides and clip to hold them together. 

Attach the interfacing to the wrong side of the bag linings.


With the faux leather and lining, right sides together, slip the zip between them so that the slider faces the outer fabric.  Sew to one side of the zip using a zip foot and a long stitch as there are lots of layers to sew through (I set my stitch length at 4 here).

Do the same for the other lining piece and the outer fabric when sewing them to the other side of the zip. 

Trim the fleece back close to the stitches to reduce bulk.


Top stitch along each side of the zip for a professional appearance and to prevent the fabric getting caught in the zip. I increased my stitch length to 5 when top stitching parallel to the zip.


Step 5: Assembling the bag


Spread out the fabric so that the right sides of the faux leather bag sides are together and the lining pieces are also right sides together.  Sew all round, making sure that the seams match where you have changed from one colour faux leather to the other.  Leave a gap of about 5”/12.5 cm at the bottom of the lining for turning and ensure that the zip is left open.
Trim the fleece back as close to the stitches as possible to reduce bulk.


With right sides still together, squash each bottom corner of the bag and lining so that the centre of side seam matches the centre of the bottom seam.  Measure ½” from the corner, mark and sew across to create a slim base to the bag.  Do this for both outer and lining corners.

Turn the bag through and sew up the gap in the lining.


Your bag is now finished.  Put your valuables in it and head towards the nearest coffee shop to reward yourself.  I took mine to Costa and had a gingerbread latte and gingerbread muffin.  I definitely feel that Christmas is approaching when it’s gingerbread season.


In this project I learnt:
  • I got on much better with the faux leather this time.  I read somewhere that you should increase your stitch length and it certainly worked. I didn’t need to use a special foot at all, even for the top stitching and the stitches were lovely and even. 
  • The corners were an afterthought to give the bag a bit of depth because it looked a bit flat.  I think they really enhance the simple shape.  It was hard to match up the seams because I had to do it by feeling, but one side was perfect and the other was only a slightly out and I’m happy with that.
  • I would like to add a tassel but I don’t have any gold tassel caps (to match the gold slider), so that will have to wait until later.  I was going to use a black slider and silver tassel cap but changed my mind at the last minute.  I have a scrap of the black faux leather left over which I shall keep somewhere safe until then.  To make a tassel, all you need to do is cut into the faux leather so that it looks like fringing, roll it up and glue it into a tassel cap (I did this with Bag 36, the faux leather fold over clutch, and it still looks great despite a lot of wear and tear).  I've ordered the tassel caps and when they arrive, I'll make the tassel and add a photo.

Sunday, 25 September 2016

Bag #38: Painted Tote Pouch


This week’s bag is a pouch to hold all those calico bags we need to carry around to avoid having to pay 5p for a plastic bag.  It is made entirely from heavy calico with no interfacing or lining but has French seams as I hate seeing raw edges. The strap could be attached to the pouch, but I chose to make a detachable strap.  The strap could be any width of your choosing to match your hardware.  I chose to make mine ½”/12 mm wide.

I attended the Crafting at Ally Pally event in London last weekend and was lucky enough to see a demonstration and do a ‘make and take’ at Pink Ink Designs.  I was shown how to use fabric paints like water colours so that the colours merge into each other. You can see them teaching this technique from time to time on Hochanda, a UK TV craft channel. Coincidentally, I also recently found out that rubber stamps can be used for stamping on fabric if using a suitable ink.  I decided to put the two together and make a bag which could have an image stamped on it and then coloured in with fabric paint.  This also taps into the current trend of adult colouring in, but is a little more sophisticated.  I chose a selection of my existing rubber stamps.  I used Deco Art So Soft matt fabric paints and a Tulip pearl pink which I already had.  Pink Ink introduced me to Cosmic Shimmer lustre fabric paints which contain mica and are super sparkly.  I bought the turquoise (actually called 'sea green') at Ally Pally and the silver glitter which I brushed liberally over the matt paints. 

I chose to paint both sides of the pouch, but if you were short of time you could just paint one side.

I love the look of the image on this bag.  For the first 24 hours after making it, I wouldn’t let it out of my sight, I was so proud of it.

The finished size is 9”x 7½” (23 cm x 19 cm).

You need a 9”/23 cm strip of calico for this project.

I used my normal stitch length (2.5) throughout but increased it to 3 for topstitching and used ¼”/6mm seams.

I have included metric and imperial measurements but they are not exactly interchangeable, so you should stick to either one or the other.


Skills used in this project:
  • Using rubber stamps on fabric
  • Painting on fabric
  • Using rivets


Step 1: Cutting out

Cut out the following from the calico:

11” x 9” (28 cm x 23 cm) Bag sides (cut 2)

3” x 2“  (7.5 cm x 5 cm) Zip Tabs and D ring tab (cut 3)

12” x 2” (30 cm x 5 cm) Strap (cut 1)

9” /23 cm zip

½”/12 mm D ring

Swivel clasp (same size as D ring)

Rivet (optional)

Rubber Stamps

Ink Pad suitable for stamping on fabric (I used Versacraft)

Fabric Paint


Step 2: Painting the bag

Wash the calico first as fabric paints adhere better to fabric which has been washed.


Stamp the design onto the calico and heat seal by ironing with a cloth between the iron and fabric to protect the design (I use a man's handkerchief).


Paint using fabric paints.  Follow instructions on paint bottles to make permanent.

Assemble the bag when the paint is dry.


Step 3: Making the zip tabs and inserting the zip


Fold the tabs in half so that the shorter edges meet.  Press.  Fold the shorter edges under by ¼”/ 6 mm and press.  Wrap a tab around each end of the zip overlapping the zip by about ¼”/ 6 mm and sew across the open end of the tab to secure.  Trim the tabs so that they are the same width as the zip.


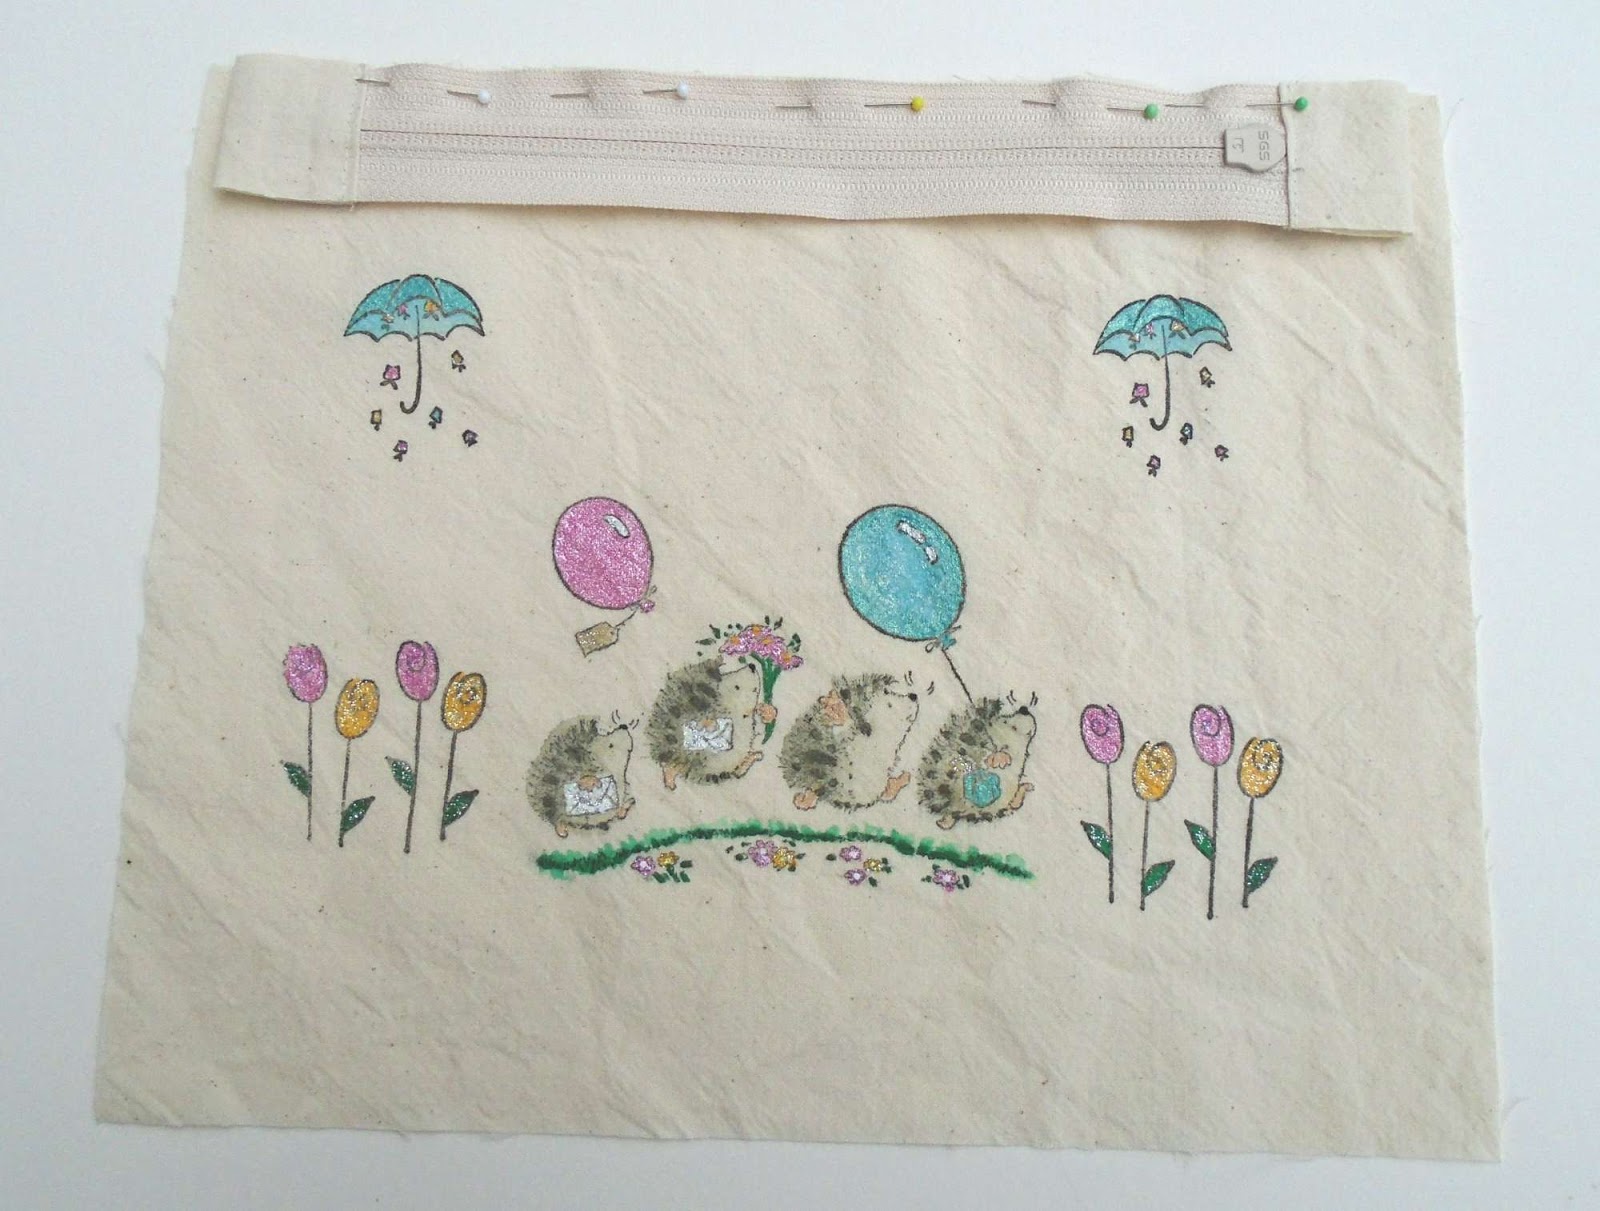
Place the top edge of one bag side against one edge of the zip, right sides together as shown in the photo. The zip and tabs will be slightly shorter than the width of the bag.  Make sure the zip is positioned centrally. Sew using a zip foot.

Sew the other bag side to the other edge of the zip. 


Top stitch along each side of the zip for a professional appearance and to prevent the fabric getting caught in the zip.


Step 4: Make and attach the D ring tab

(I made the D ring tab and strap at the same time because they use the same technique although the finishing is slightly different).


Fold the fabric in half lengthways to find the centre and press.  Fold each side in so that the edge is against the fold line and press.  It will now look like bias binding.  Fold in half along the original fold, press again and top stitch close to the edge along each long side.  This will hold it together and make it look professional.

Fold in half over a D ring so that raw edges meet.


Sew to right side of the fabric at one edge as shown in photo.  The tab should be quite long at this stage because the bag will be sewn using French seams which means that they will be double their normal width. 


Step 5: Assembling the bag


With the zip open and the 2 bag sides wrong sides together, sew all round.  Start at the zip and sew down one side, across the bottom and up the other side, ending at the zip. You need to keep these seams quite narrow.


Now turn the bag wrong side out and sew the same seams, this time encasing the raw edges.  If necessary trim the edges and D ring tab to make sure that they will be within the seam allowance (you don’t want any raw edges showing).

Turn right side out and press.


Step 6: Making the strap

Make the strap in the same way you made the D ring tab, but make sure the raw edges at the ends are folded inside the strap before sewing it.

The end of the strap needs to be secured to one end of the clasp. This can be done by sewing it or by attaching rivets.  I prefer rivets because they are super sturdy.


To attach a rivet, first make a small hole through all the layers of the strap (see photo to see where it should be positioned).  I used a tailor’s awl to do this.  Push the long part of the rivet through all layers.  Place the stud part of the rivet on to it and press to temporarily secure.  Use a hammer to bang the 2 parts firmly together. I put soft cardboard between the hammer and rivet to avoid damaging it.


Now fill your pouch with some of those pesky shopping bags and you will never forget them again.  I feel another shopping trip coming on!


In this project I learnt:

  • It was surprisingly easy to use rubber stamps on fabric.  I used a scrap of calico to practise on first of all.  It was the first time I had used Versacraft ink which gave a lovely bold outline.  I heat set it by ironing it and the colour didn’t run when I added paints, even when I added lots of water.
  • It was fun trying out the different paints.  I love the Cosmic Shimmer paint; it was so sparkly that it really lifted the image.  I didn’t have a brown paint for the hedgehogs, so I just mixed all the matt colours until I got something resembling a dirty brown.  I used the watercolour technique for the hedgehogs and grass by painting part of it and then pulling the colour with water onto neighbouring parts of the image for a much paler version of the colour. It took a long time to paint both sides of the bag but it was a lot of fun and I can’t stop admiring the end result.  Definitely worth all the time spent on it.  Now I keep wondering what to paint next. 
  • I find rivets easier to fix each time I use them. I like knowing that the strap is really firmly fixed and won’t come undone.  It also gives a professional finish to the bag.